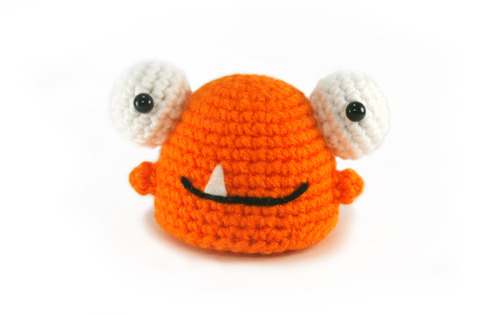
Meet Binky's newest friend, Boggle the Gumdrop (not destroyer!) Monster! 

Once again, I copied this pattern straight from my tumblr account. There seems to be more crafters on blogger so maybe I will post my patterns here and more picture on tumblr. Or maybe I'll abandon my tumblr completely? I'm not sure yet. I wish I could figure out how to add more pages to my blog. I FINALLY figured out how to switch my email account on here. I'll be sure to get to your comments now!
Note: I use the magic ring to start my amigurumi (tutorial by June Gilbank here), but if you feel uncomfortable with this technique, you can chain 2 and start the round in the 2nd chain from your hook.
Materials Needed:
F hook
Worsted weight yarn in orange, white, and black
8mm safety eyes
White felt
Your choice of stuffing. I use polyester fiberfill
Cardboard
Pencil
Scissors
Tapestry Needle
Fabric glue or white embroidery thread
Abbreviations:
sc: single crochet
inc: 2 single crochet in 1 stitch
dec: single crochet 2 stitches together
*...*: repeat anything in between
(#): # of stitches in each round
FO: Finish off.
PATTERN:
Body:
Rnd 1: 6 sc in magic ring (6)
Rnd 2: *inc* (12)
Rnd 3: *sc, inc* (18)
Rnd 4: *2 sc, inc* (24)
Rnd 5: *3 sc, inc* (30)
Rnd 6-8: *sc* (30)
Rnd 9: *4 sc, inc* (36)
Rnd 10-13: *sc* (36)
Rnd 14: *11 sc, inc* (39)
F/O. Weave in tails.
Base:
Rnd 1: 6 sc in magic ring (6)
Rnd 2: *inc* (12)
Rnd 3: *sc, inc* (18)
Rnd 4: *2 sc, inc* (24)
Rnd 5: *3 sc, inc* (30)
Rnd 6: *4 sc, inc* (36)
Rnd 7: *11 sc, inc* (39)
F/O. Leave long tail to sew together base and body.
Arms: Make 2
Rnd 1: 4 sc in magic ring (4)
Rnd 2: * sc, inc* (6)
F/O. Leave tail to sew to body.
Eyes: Make 2
Rnd 1: 6 sc in magic ring (6)
Rnd 2: *inc* (12)
Rnd 3: *sc, inc* (18)
Rnd 4-6: *sc* (18) Attach safety eyes between rounds 4 and 5.
Rnd 7: *sc, dec* (12)
Stuff. F/O. Leave tail to sew to body.
Attachment:
1. Embroider smile with black yarn onto the body. My smile is between rounds 11 and 12 and 5 stitches apart. The outer curves are 2 stitches apart and go diagonally up 1 round. (Basic smile tutorial made by me can be found here. Scroll down to see it.)
2. Use the base to trace a circle onto a piece of cardboard. Cut circle out. This will be used to keep Boggle's bottom flat.
3.- Using the tail of the base, begin sewing the base and body together. Be consistent! I recommend using a whip stitch to sew through either both loops or only the front loops of the base and body.
- When half way done sewing, start stuffing the body. Insert cardboard circle between stuffing and base. Continue sewing and stuffing until completely closed. Weave tail into body and F/O.
4. Sew eyes to body. The top of my eyes are sewn around rounds 5 and 6 of the body. Weave tail into body and F/O.
5. Sew arms to body. My arms are between rounds 11 and 12.Weave tail into body and F/O.
6. Cut a triangle out of the white felt and glue or sew onto the smile.
And there you have it! Your very own Boggle the Gumdrop Monster! I hope you enjoyed this pattern.
Feel free to contact me if you have any questions at jdalipe09@yahoo.com or my facebook page at facebook.com/craftyhanako.

Boggle the Gumdrop Monster by Justine Dalipe is licensed under a Creative Commons Attribution-NonCommercial 3.0 Unported License.
Based on a work at http://hanakoheals.tumblr.com/post/57894019517/pattern-boggle-the-gumdrop-monster.
You may not sell this pattern. You may sell finished products made by this pattern at craft fairs/conventions/anywhere in person. You may not sell finished products made by this pattern online. Thank you for your cooperation.
Hey- just curious- do you mean "add pages" as in tabs (bar across the top and buttons?)
ReplyDeleteYes! Sorry so late, I'm not getting alert emails.
Delete